
Recently I was introduced to a chain-making technique known as ‘Viking Knit’. I’ve come to realise that what I love most in jewellery making and other crafts is taking one single ‘thread’ of wool/wire/cord etc. and weaving/knitting/knotting to make something far fancier than you would ever think possible. Because of this, Viking Knit has become my new favourite technique.
A few weeks ago I posted the picture below on both my personal and my business Facebook pages. It shows the very first stage of the Viking Knit process – the ‘flower’, and garnered quite a lot of interest from people who were curious as to how it would transform in to the hollow, flexible chain I’d been working with.

Truthfully….. it doesn’t…..
But whilst the flower never ends up in the final cut, it is nonetheless essential as, when the petals are folded down over a mandrel, it provides an anchor to begin the weave from.

Once the flower is secure, a new length of wire (I prefer to work with a ‘wing-span’ at a time) is woven around the flower, looping its petals together. Once all the petals are looped together, a new row can be formed by looping the wire around the first row of loops, then the third row is formed by looping around the second row, and so on. This may sound a little confusing, but you soon get in to a rhythm and the wire just spirals around. If this has sparked your curiosity there are plenty of tutorials out there that will explain this a lot better than I can with step-by-step pictures.

After quite some time (look – it’s daylight now!), you will reach breaking point your desired length*. It is now ready to be taken off the mandrel. At this point it might look impressive, but not necessarily like something you could wear with pride. The loops will be uneven and the points where you’ve ‘spliced’ one length of wire to the next are visible. It doesn’t flex well enough to sit comfortably on your wrist or neck, yet feels weak enough that with enough pressure from your fingertips it could easily be bent out of shape. But don’t fret…. this is when the magic happens!

Grab a draw-plate. You can buy fancy ones made out of metal and plastic. Or you can make one yourself with a plank of wood, various sizes of drill bits, and some sandpaper. The key element of a draw plate is that it has a series of holes, each decreasing slightly in diameter (use the sandpaper to smooth these holes down – any roughness can damage your wire). Take a comfortable pair of pliers – the process can get quite tough – and pull the raw chain through the holes from biggest to smallest, using the ‘stalk’ of the flower as a grip.

As the wire gets drawn through the hole, it is compressed. This process evens out the weaving, whilst also making it increasingly more flexible. Eventually, the wire won’t compress any further, but depending on the look you want, you may not need to go that far.

*Getting to the desired (or required) length is trickier than it first appears. The drawing process means that as the chain becomes thinner, it also becomes longer. Working out how much of the raw chain is required to make enough finished chain takes a bit of calculation and experimentation. As with most things it’s best to err on the side of caution and make the raw chain a little longer than you think you’ll need it (as you can’t add to the chain once it’s been drawn), but you don’t want to add too much as this will result in wasted time and wasted wire.
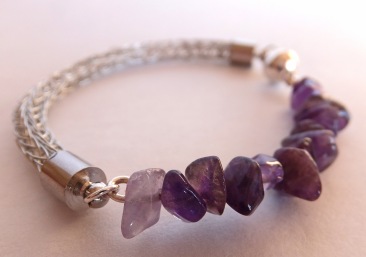
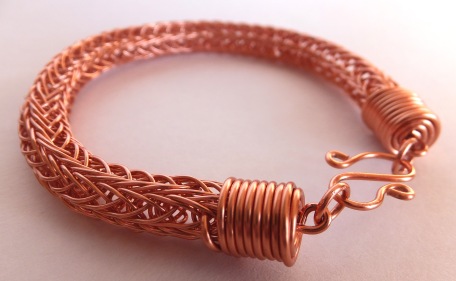
From this point, the Viking Knit chain is ready to be cut up and made in to jewellery, just like the bracelets below:

Variations
The best part of Viking Knit is that there are so many variations. There are more obvious ones, such as using a different colour wire, and using different gauges (thickness) of wire will produce predictably chunkier or finer chains.
Additionally, you can experiment with the number of petals used in your starting flower. The number of petals used will correspond to the number of ‘columns’ the chain will have (in the finished pieces these columns look like lines of tight ‘>>>>>>>>’). The more columns, the denser the chain will look when compared to a chain of the same wire drawn to the same thickness. For example, the chain pictured throughout the creative process was made with a six petal flower, whilst the two bracelets pictured together above were made with a five petal flower. Everything else remains the same, but the latter example has a more open, lightweight look.
Finally, I have perhaps misled you a little… technically all the examples above have been made with the “Double Knit” technique. In the original, single knit method (as described), each row is formed by looping the wire around the loop on the previous row. In double knit, the wire is looped around the one before the previous loop. So instead of row 2 being looped around row 1, row 3 being looped around 2, 4 around 3 and so on, the chain starts with row 3 being looped around row 1, row 4 looped around 2, and 5 around 3 etc. Again, this all probably sounds confusing but you fall in to a nice rhythm when weaving and you’ll soon be able to do it in your sleep! Double Knit produces more ‘rungs on the ladder’ and, as before, contributes to a denser look. Double Knit takes longer to make as you are essentially doubling the number of weaves you need to make. There is such a thing as Triple Knit…. but this is not for the feint hearted!

Of course, there are plenty more variations to these, and combined the possibilities are endless. Let me know in the comments below which look is your favourite!
Next week I will be delving deeper in to Viking Knit and discovering the history of this striking and versatile technique.


One thought on “How is Viking Knit Made?”