The History of Viking Knit

After my last post on How Viking Knit is Made, I thought it would make sense to continue along this theme with a little post about the history of this intricate weave.

Honestly, it takes quite a bit of digging to find reliable and accurate accounts of this technique. Many fellow artisans speak about it in very vague terms, describing it as ‘ancient’, and (if you’re lucky) might even share with you the century it all dates back to. Unfortunately, I have found many examples of sellers quoting conflicting dates and (unsurprisingly) no sources to back up these claims.

Viking Knit is a beautiful technique in and of itself with an almost infinite number of variations and adaptations that I believe it would sell just as well without having to cling on to some sketchy claim about its historic authenticity. So call me pernickity, but I think if you are going to make such a claim, you should really do your research and make sure you are getting it right.

If you search for Viking Knit on the British Museum website, you will get zilch. But, conduct some more thorough googling and you might discover that Viking Knit is also known as Trichinopoly Chain, and a British Museum search of that term brings up something far more satisfying.

A more 'rustic' looking example of Trichinopoly chain
A more ‘rustic’ looking example of Trichinopoly chain
A scourge (whip) using Trichinoploy weave and beads
A beautiful example of Trichinoploy weave jewellery

Trying to narrow down a date or era for these pieces was also problematic. However, a paper by Lora-Lynn Stevens (“A Research Journey: Trichinopoly Chainwork. Is It Viking Chain Knitting?”, via relicuus) describes a number of items, fitting this description dating as far back as the 8th-9th century and spread over many areas of known Viking conquest, including Denmark and Ireland.

Not just reserved for jewellery, it has also been found used as trimming on clothes and sacred vessels, such as this paten found in an Irish hoard

This paten would have been used to hold bread as part of religious ceremonies
A close-up of the paten shows a trim made from a Viking Knit chain

But how did the Viking Knit technique come to be? If you’ve read my previous blog about how it is made, you’ll realise that whilst not necessarily a complicated technique, it isn’t one you might just stumble upon whilst playing with a length of wire. Many people investigating VK have noticed a striking similarity in appearance of Trichinopoly weave and another, even more ancient technique, Loop-in-Loop. It is only on very close inspection that subtle differences can be seen, the subtle differences that arise from having been crafted in quite a different way.

An example of Loop-in-Loop jewellery

Unlike VK (which uses a long, continous length of wire), Loop-in-Loop uses small loops of wire that are fused together to make the chain. As I’m sure you can imagine, this would have been quite a labour-intensive method.

Other researchers point to Nålebinding (which Wikipedia tells me is Danish for needle-binding) being the inspiration for VK. Firmly originating within the fabric and clothes-making worlds, it is a similar technique to knitting and crocheting, only far more ancient.

Nålebound socks from Egypt (300-500 AD)

Both of these techniques had been in use for centuries before VK appeared, and you may be wondering why they had gone on for so long, in the same geographical locations, without anyone thinking to combine them – no examples of VK have every been found dating earlier than the 8th century, whilst examples of Nålebinding have been found as early as 6500 BCE, and Loop-in-Loop seems to originate from around the 1100s. Julia from relicuus.com wondered this too. Her research focused on the availability of suitable materials – after all, whilst VK is a simpler technique than loop-in-loop it does require sufficient lengths of wire to create.

How to make viking knit draw plate

To produce a long length of wire, a draw plate needs to be used (see my previous blog post which illustrates the same principle – a wide ‘tube’ is pulled through holes of decreasing diameter so that it ‘stretches’ in to something longer, narrower and more flexible). Previous methods of wire production included hammering and block-twisting which aren’t able to produce wire that is thin enough or flexible enough (respecitvely) to be braided or knitted. So when draw plates where introduced in the mid-eighth century, it’s not too surprising that the big Viking Knit breakthrough followed shortly after!

Modern Viking knit makes the most of all the latest developments in wire production and Trichinopoly theory. Recent examples will often appear much more uniform in shape, although I have seen many interesting items where the designer has kept a ‘rustic’ look by skipping the draw plate and rolling the raw chain by hand (much like you would roll a sausage of pastry to make it longer and thinner). Other designs include anachronistically contemporary components, like Swarovski beads and magnetic clasps, whilst others have gone for a more classic look with wire-wrapping techniques and animal-headed terminals.

modern example 1modern example 2Rose Gold

If you’re interested, check out my pinterest board featuring more images I’ve collected of Viking Knit designs new and old.

Thanks for reading!

Sig

How is Viking Knit Made?

Recently I was introduced to a chain-making technique known as ‘Viking Knit’. I’ve come to realise that what I love most in jewellery making and other crafts is taking one single ‘thread’ of wool/wire/cord etc. and weaving/knitting/knotting to make something far fancier than you would ever think possible. Because of this, Viking Knit has become my new favourite technique.

A few weeks ago I posted the picture below on both my personal and my business Facebook pages. It shows the very first stage of the Viking Knit process – the ‘flower’, and garnered quite a lot of interest from people who were curious as to how it would transform in to the hollow, flexible chain I’d been working with.

How to make viking knit flower
The ‘Flower’: How each piece of Viking Knit chain begins!

Truthfully….. it doesn’t…..

But whilst the flower never ends up in the final cut, it is nonetheless essential as, when the petals are folded down over a mandrel, it provides an anchor to begin the weave from.

How to make viking knit flower on mandrel 2
How to Make Viking Knit: beginning steps

Once the flower is secure, a new length of wire (I prefer to work with a ‘wing-span’ at a time) is woven around the flower, looping its petals together. Once all the petals are looped together, a new row can be formed by looping the wire around the first row of loops, then the third row is formed by looping around the second row, and so on. This may sound a little confusing, but you soon get in to a rhythm and the wire just spirals around. If this has sparked your curiosity there are plenty of tutorials out there that will explain this a lot better than I can with step-by-step pictures.

How to make viking knit raw chain
Viking Knit (Raw Chain)

After quite some time (look – it’s daylight now!), you will reach breaking point your desired length*. It is now ready to be taken off the mandrel. At this point it might look impressive, but not necessarily like something you could wear with pride. The loops will be uneven and the points where you’ve ‘spliced’ one length of wire to the next are visible. It doesn’t flex well enough to sit comfortably on your wrist or neck, yet feels weak enough that with enough pressure from your fingertips it could easily be bent out of shape. But don’t fret…. this is when the magic happens!

How to make viking knit tools
Making Viking Knit: some of the tools you’ll need

Grab a draw-plate. You can buy fancy ones made out of metal and plastic. Or you can make one yourself with a plank of wood, various sizes of drill bits, and some sandpaper. The key element of a draw plate is that it has a series of holes, each decreasing slightly in diameter (use the sandpaper to smooth these holes down – any roughness can damage your wire). Take a comfortable pair of pliers – the process can get quite tough – and pull the raw chain through the holes from biggest to smallest, using the ‘stalk’ of the flower as a grip.

How to make viking knit draw plate
Making Viking Knit: drawing the chain

As the wire gets drawn through the hole, it is compressed. This process evens out the weaving, whilst also making it increasingly more flexible. Eventually, the wire won’t compress any further, but depending on the look you want, you may not need to go that far.

How to make viking knit finished length
Making Viking Knit: the finished chain

*Getting to the desired (or required) length is trickier than it first appears. The drawing process means that as the chain becomes thinner, it also becomes longer. Working out how much of the raw chain is required to make enough finished chain takes a bit of calculation and experimentation. As with most things it’s best to err on the side of caution and make the raw chain a little longer than you think you’ll need it (as you can’t add to the chain once it’s been drawn), but you don’t want to add too much as this will result in wasted time and wasted wire.

From this point, the Viking Knit chain is ready to be cut up and made in to jewellery, just like the bracelets below:

DSCF4337
Silver plated Viking Knit bracelet with optional monogram tag and bead
DSCF4358
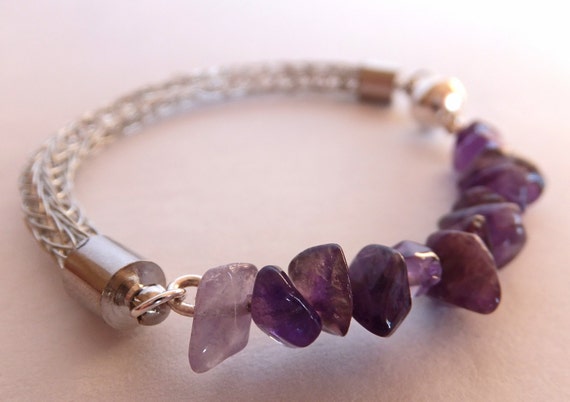
Silver plated ‘petite’ Viking Knit bracelet with Amethyst stones and magnetic clasp

Variations

The best part of Viking Knit is that there are so many variations. There are more obvious ones, such as using a different colour wire, and using different gauges (thickness) of wire will produce predictably chunkier or finer chains.

Additionally, you can experiment with the number of petals used in your starting flower. The number of petals used will correspond to the number of ‘columns’ the chain will have (in the finished pieces these columns look like lines of tight ‘>>>>>>>>’). The more columns, the denser the chain will look when compared to a chain of the same wire drawn to the same thickness. For example, the chain pictured throughout the creative process was made with a six petal flower, whilst the two bracelets pictured together above were made with a five petal flower. Everything else remains the same, but the latter example has a more open, lightweight look.

Finally, I have perhaps misled you a little… technically all the examples above have been made with the “Double Knit” technique. In the original, single knit method (as described), each row is formed by looping the wire around the loop on the previous row. In double knit, the wire is looped around the one before the previous loop. So instead of row 2 being looped around row 1, row 3 being looped around 2, 4 around 3 and so on, the chain starts with row 3 being looped around row 1, row 4 looped around 2, and 5 around 3 etc. Again, this all probably sounds confusing but you fall in to a nice rhythm when weaving and you’ll soon be able to do it in your sleep! Double Knit produces more ‘rungs on the ladder’ and, as before, contributes to a denser look. Double Knit takes longer to make as you are essentially doubling the number of weaves you need to make. There is such a thing as Triple Knit…. but this is not for the feint hearted!

???????????????????????????????
An Example of a Single Knit Viking Chain Using Silver Plated Wire
DSCF4366
An Example of a Double Knit Viking Chain Using Copper Wire
triple-knit-011
An Example of a Triple Knit Viking Chain Using Blue Artists’ Wire

Of course, there are plenty more variations to these, and combined the possibilities are endless. Let me know in the comments below which look is your favourite!

    Next week I will be delving deeper in to Viking Knit and discovering the history of this striking and versatile technique.

Sig

5 Top Tips for Requesting a Custom Order on Etsy

Picture the scene:

A man walks in to a hand-made ladies’ fashion boutique with a proposition for the owner…

[Man]: I see you make clothes. Could you make me a white suit?

[Owner]: Well, as you can see, I normally make women’s clothes but I make trousers and jackets, so perhaps with a bit of research I might be able to adapt my knowledge and make you a men’s suit. Could you tell me more about the style of suit you would like?

[Man]: *Produces picture of a Spacesuit*

[Owner]: …………

Don’t expect to find this in Forever 21…

Recently I was contacted by a buyer on Etsy asking me for a similarly absurd request. Like many other Etsy sellers, I love taking custom orders. I even invite my customers to do so by featuring a banner which reads “Request a custom order and have something made just for you” on practically every item in my shop. The link takes you straight to a handy little message box where you can tell me (or any other seller displaying the banner) what you want and when you want it by.

“Request a custom order” banner, found below item picture

You may have already seen this and been tempted. What you may not have realised, is there’s a certain (yet simple) etiquette to bear in mind when asking for a custom order. Here are 5 Top Tips to remember:

Tip 1: Don’t ask a dress-maker for a spacesuit….

Like in the little story above, make sure that you are contacting the right person for the job. Make use of the search and browse functions on the Etsy site. If you’re lucky, you might find just what you were looking for in the first place. But even if you don’t, there is such a vast range of items available that you will probably find something similar. How do you know if you’ve found the right person for the job? If you can (honestly) picture your dream item nestled in there amongst the other stock then you could be on to something.

Tip 2: Know the difference between a custom order and a commission

When an Esty seller chooses to display the ‘Custom Order’ banner, what they usually have in mind is a modification. Found a nice necklace, but you want green stones, not blue? Use the custom order link. Spotted the perfect cushion, but you want it rectangular, not square? Custom order link. Want to combine features from three different items of clothing in the Seller’s shop to make a super-dress using a fabric similar to one you saw on ASOS? Custom order link! Certainly many sellers will take on more ambitious projects, and you may even find that the seller had already considered similar products but something had stopped them. For example, in my own jewellery shop I had thought about designing a men’s range but didn’t know much about the market – what men were looking for, how much they expect to pay, etc – and I had put it off until that blue-moon day when I finally had the time to look in to it. So when a buyer asked me to make a ‘men’s version’ of a necklace I already stocked I was more than happy to oblige. But if what you are looking for is too ambitious or too different from what they already make, that’s a commission. Will Etsy sellers consider commissions? More than likely yes, but you should probably check out the next point before you ask….

Tip 3: Be realistic

When placing a Custom Order, the seller may not need to make many, or even any, special purchases as they are already making similar pieces. Some sellers may be happy to make slight modifications (usually listed in the description box) without charging any extra. If you want something made with more expensive ingredients (gemstones instead of glass beads, silk instead of polyester, and so on), or you want it pretty quickly, then you will more than likely be quoted a little higher than the standard price, but it’s not exactly rocket science to work that out. Commissioned work, on the other hand is always more expensive than an ‘off-the-shelf’ product. It’s not like it’s a con to extract as much money from a desperate customer, it’s simply the nature of the beast. If the seller is not already stocking something similar, then it’s not just because they haven’t had the same brain-wave as you, it’s because they don’t have the materials, the tools and perhaps even the knowledge to make it. Many supplies have to be bought in bulk or by the yard/metre/foot – if the seller can find a stockist to provide the exact quantity of materials needed, they will pay a premium. Tools are expensive, but the cost is usually spread out and factored in to the price of the many items that can be made with it – but what if the seller has no need for the tool beyond your order? Additionally, if it is a new technique, the seller may need to make a few prototypes to practice on before starting the real thing, and that of course uses up materials. If a product is being made especially for you, then you should expect those costs to be reflected in the price you pay. Again, this is another reason why you should find the right person for the job.

Tip 4: Be sensible

Most business of any type have been let down at one time or another by clients and customers who haven’t paid up. Small-scale sellers (like most Etsy shops are) will need to protect themselves. Because of this, you should appreciate that many sellers will ask for a percentage of the agreed price, or sometimes even the full amount, as a deposit before they will even order in the supplies (although this is less likely for minor modifications). The nature of distance selling is that you will almost always have to part with your money before actually receiving the goods. Etsy is better equipped to step in when a seller hasn’t kept their end of the deal than when a buyer hasn’t, and all Etsy shops know the value of a good reputation, so you’re usually pretty safe. But that doesn’t mean you can let your guard down 100%. Factor in any reviews they have (bearing in mind that people are way more likely to shout about terrible service than they are for average and above) and as with anything in life, if it seems fishy then there’s probably good reason and maybe you should rethink who you order from.

Tip 5: Be clear about what you want, but be open to suggestions

Ultimately, you want to have an honest and open channel with the seller to make sure you get exactly what you want. The more detail you can provide about something, the better the seller will be able to interpret it. Pictures are a great help and are far less likely to get lost in translation – Etsy makes it easy to add them to your message (see image below). It’s not unreasonable to expect/request updates, particularly on the more elaborate works, but in return appreciate that the seller is not likely to have the time or patience to take a photo and upload it every time a bead is threaded or a seam is hemmed! If you are not sure along the way, speak up. The worst thing to do would be to wait until the item is complete (when it may be very difficult or even impossible to alter) and then either be stuck with something you’re not happy with, or chicken out of the final sale and leave the seller up the proverbial creek. Even if it’s just a little niggle, or you hope it’s just the a bad angle, as long as you’re polite about it we’ll be happy to put your mind at ease about any crappy photography skills, or rough edges that will be sanded down in the final stages, as well as make any alterations that you want. All reputable sellers will send you a final photo and wait for your approval before they charge any remaining balance and send it out. Additionally you should respect that the sellers know their craft better than you do (otherwise you’d be making your item yourself!). You may have to accept that your dream piece simply cannot exist in the real world exactly as you imagined it. Or – it might cost way more than could justifiably be charged to create it (see Tip 3 about commissions). A good seller will be honest with you about any problems as soon as they arise, and they should be able to offer up suitable alternatives.

Easily add a picture to your custom order request on Etsy

And…. Bonus Tip!:

Don’t ask a seller to replicate another seller’s design (“but cheaper”). I don’t think I need to explain why this is just rude…

I hope these tips have been useful, especially if you had never thought about asking for a custom order before. Happy shopping Etsy lovers!

Sig

jewellery bowl: sweetjessie

Valentine’s Day… at the Rock, Gem and Bead Show in Cheltenham!

In case you missed it (although you would probably have to be living under a rock to) it was Valentine’s Day on Saturday!

Whilst couples around the world were swooning over gifts of flowers and chocolates and candlelit meals, I was venturing up to Cheltenham for the famous Rock, Gem and Bead Show.

Pittville Pump Room
Pittville Pump Room, Cheltenham, Gloucestershire (UK)

Held at the historic Pittville Pump Rooms, the Rock, Gem and Bead Show brought together exhibitors from around the globe to showcase and sell their glistening wares.


From freshwater pearls to healing crystals, from tiny chip-beads to giant amethyst geodes, the show was truly a fantastic sight.

But of course, being a jewellery maker I wasn’t there for the rocks. For me, the main event was the beads….. And boy, were there beads!

Just some of the beads on display at the Rock, Gem & Bead Show in Cheltenham this year

Fantastic rainbows of beads, laid out for me to peruse – I was in heaven! Every single colour and shape – there was a bead for that! However, I was under strict instructions (from myself) to behave and stick to my ‘shopping list’. My Stone Chip Viking Knit bracelets in Amethyst have proven popular so far and I wanted some more semi-precious gemstones to add to the collection. In the end, I left home with my bag bulging with Mother of Pearl, Pink Quartz, Blue Goldstone (a beautiful nearly-black shade of blue, with tiny sprinkles of gold – the night sky in a gemstone!), Fluorite (well-coordinated shades of purples and greens – one of my favourite looks), dyed Blue Howlite (a strikingly bright aqua/turqouse stone), and Blue-Vein Treadstone (which, fact-hunters, is known as ‘蓝纹石’ in China).

After finally getting some order back in to my work area (because frankly it was chaos!), I spent Sunday threading these up in to components for my bracelets. I’m waiting on a delivery of some more fine Silver Plated wire, so the Viking Knit part will have a to wait for now. But here they are so far (smart arses amongst you will spot that I missed out the Pink Quartz – oops!):

Front to back: Mother of Pearl, Fluorite, Amethyst, Blue Treadstone, Blue Howlite, Blue Goldstone

What’s your favourite?

Eventually, they will be added to the silver-plated Viking Knit chain and will look something like this:

Silver Plated Viking Knit Artisan 'Petite' Bracelet with Real Amethyst Chips and Magnetic Clasp - MADE TO ORDER
Silver Plated Viking Knit Artisan ‘Petite’ Bracelet with Real Amethyst Chips and Magnetic Clasp – Available on the BirnbeckBeads Etsy store

Anyway, back to you guys. How did you all spend Valentine’s Day? Hopefully I wasn’t the only one being hopelessly unromantic!

“Begin, be bold, and venture to be wise”

You can always rely on the Roman poet Horace to provide a bit of inspiration when it’s needed.

It is with this post that I begin my foray in to the blogisphere, like the newly born Bambi, stumbling around ungraciously.

Beginings start with introductions. My name is Vikki. I am 27 years old. I run my own jewellery business, called Birnbeck Beads. I also have a ‘day job’, but maybe I’ll go in to that at a later date.

Birnbeck Beads began when my mum showed me how to make a Shamballa bracelet:

10343531_505543832905286_3778604142848578783_n il_570xN.604724922_h4wj

In case you’re not familiar with this technique, these bracelets are made with a type of Macrame knot (square knots) repeated over and over. Once you have got the hang of it, it’s a fairly simple but effective skill. Combining other knots can produce  some truly fantastic designs:

http://www.macrameschool.com

If you like the look of these, have a look at the Macramé School website for free tutorials.

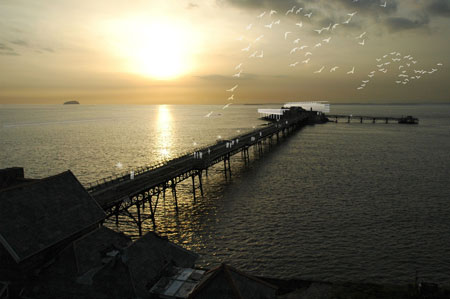
I started my business in Spring 2014 and named it after the dilapidated Victorian pier I could see from my house. I hoped this would never become a metaphor for my business, but I just loved the silhouette it cast as the sun set.

Birnbeck Pier, Weston Super Mare (www.dezeen.com)

I’ve tried my hand at a few techniques and currently I’m in love with Viking Knit. I’m planning on doing a blog post or two telling you more about this style, what do you think? Here are a couple of pieces from my latest collection:

Silver with Hand Stamped Tag and Bead
https://www.etsy.com/uk/listing/221822544/silver-plated-viking-knit-artisan-petite
Silver with Amethyst Chips
https://www.etsy.com/uk/listing/221824744/rose-gold-coloured-viking-knit-artisan
Rose Gold with Beads
https://www.etsy.com/uk/listing/221830731/copper-viking-knit-artisan-bracelet-with
Simple Copper with S-Hook

(click on the links below each picture to go straight to the Etsy page)

But enough about jewellery…

This is me:

Dull… paired with Boring!

This is where I live:

Deck chair on the beach at sunset, Weston Super Mare

And this is my cat:

What a tart!

And that’s probably all you need to know about me for now.

One final point – I’m planning on posting every Wednesday. I’ve got a few things up my sleeves for the next few posts – I’m hoping to have a nice assortment of themes but of course, a little input is always appreciated. What would you like to see in these blogs? A bit of fashion? DIYs? Foodie bits? Tips for businesses? I’m hoping to incorporate a little of each… we’ll see how it goes!

Sig